Two Factor Authentication is a security measure for an account that requires the entry of an additional code, received as an SMS text message or email, after logging into an account with a login name and password. This code can also be generated using an authenticator app.
How Two Factor Authentication works
When Two Factor Authentication is activated:
- Upon login to the Alarm.com or the Fluent app, a text message or email containing a randomly generated code is sent to a specified recipient. From there, the code is necessary to log in. A code can also be generated using an authentication app. The following are example codes that can be sent:Text message
 Email
Email
- Upon successful login to the Alarm.com, you will be prompted with a message asking if the device is a trusted device.
- If Trust Device is selected, then the Two Factor Authentication process is not started upon login for that specific device.
- If Skip is selected, the device remains a not trusted device and requires a code to be submitted every time someone uses the device to log into that account.
-
Note: On the Fluent app, the mobile device is automatically trusted upon initial login with Two Factor Authentication.

To enable/disable Two Factor Authentication for a login using the Alarm.com
- Go to https://www.alarm.com/web/system/settings/login-information/login-setup/two-factor-authentication/overview
- Log in using the same username and password you use for the Fluent app.
- If disabling Two Factor Authentication, click
 next to the method needing to be disabled, and then click Disable.
 - If enabling Two Factor Authentication, click to select either Text Message, Email, or Authentication App.
If enabling Two Factor Authentication for text message
- Click Next.

- In Mobile Number, enter the mobile number to receive the Two Factor Authentication confirmation code.
- Using the Country dropdown menu, select either USA or Canada.
- Using the Provider dropdown menu, select the cellular carrier of the mobile phone number.Note: This displays the full list of Two Factor Authentication compatible cellular carriers.

- Click Send Code to send a verification code to the mobile number entered.
- In Verification Code, enter the code that is provided in a text message to the mobile number.

- Click Verify.
If enabling Two Factor Authentication for email
If enabling Two Factor Authentication for email:- In Send Verification Code, verify the correct email is displayed.
- Click Send.

- In Verification Code, enter the code that is provided in the received email.

- Click Verify.
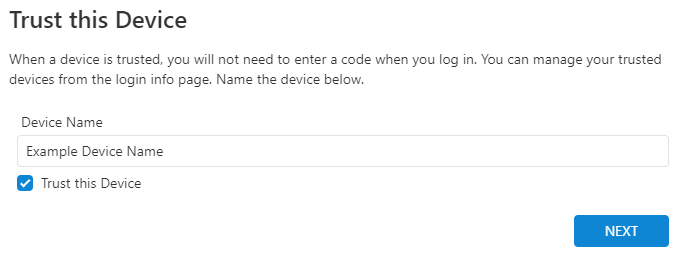
- In Device Name, enter the desired name for the current device that will be trusted.

- Click Trust This Device.
If enabling Two Factor Authentication for an authentication app
Note: A mobile device with an authenticator app is required to complete this process and the steps may vary based on the authenticator app in use- Click Authentication App
- Generate an authentication code
- Use a mobile device with an authenticator app to scan the QR code or manually enter the code provided on the Customer Website or Customer app into the authenticator app.
- In the Enter Code field, enter the code that is generated on the authenticator app to verify the device.
- Click Next.
- In Device Name, enter the desired name for the current device and click to select to Trust this Device if the device is trusted.
- Click Next.
- In Linked Devices, click Trust next to any additional devices that can be trusted.
- Click Done.
- Click Next.
To enable/disable Two Factor Authentication for a login using the Fluent app
- Log into the Fluent app.
- Tap
 .
. - Tap Login Information.
- Tap Two Factor Authentication.
- If disabling Two Factor Authentication, tap Disable and then tap Confirm.
- If enabling Two Factor Authentication, tap to select either Text Message, Email, or Authentication app.
If enabling Two Factor Authentication for text message
- Tap Next.

- In Mobile Number, enter the mobile number to receive the Two Factor Authentication confirmation code.
- Using the Country dropdown menu, select either USA or Canada.
- Using the Provider dropdown menu, select the cellular carrier of the mobile phone number that will receive the Two Factor Authentication confirmation code.
Note: This displays the full list of Two Factor Authentication compatible cellular carriers. - Tap Send Code to send a verification code to the mobile number entered.
- In Verification Code, enter the code that is provided in a text message to the mobile number entered.

- Tap Verify.
- In Device Name, enter the desired name for the current device that will be trusted.

- Tap Next.
- In Linked Devices, tap Trust next to any additional devices that can be trusted.
- Tap Done.
If enabling Two Factor Authentication for email
- In Send Verification Code, verify the correct email is displayed.
- Tap Send.

- In Verification Code, enter the code that is provided in the received email.
- Tap Verify.
- In Device Name, enter the desired name for the current device that will be trusted.
- Tap Next.
- In Linked Devices, tap Trust next to any additional devices that can be trusted.
- Tap Done.
If enabling Two Factor Authentication for an authentication app
Note: A mobile device with an authenticator app is required to complete this process and the steps may vary based on the authenticator app in use- Tap Authentication App.
- Generate an authentication code
- Use a mobile device with an authenticator app to scan the QR code or manually enter the code provided on the Customer Website or Customer app into the authenticator app.
- In the Enter Code field, enter the code that is generated on the authenticator app to verify the device.
- Click Next.
- In Device Name, enter the desired name for the current device that will be trusted.
- Tap Next.
- In Linked Devices, tap Trust next to any additional devices that can be trusted.
- Tap Done.
- Tap Next.
.png)