Alarm.com's Places feature allows you to be more connected to your home. With Places, you can automate home settings and initiate additional notifications based on the location of your smartphone relative to your home, office, or any other Geo-Fence you specify. To configure Places, follow the following steps using the Alarm.com website and Fluent app.
Enable Location Services
To configure Places, you need to enable Location Services on one or more of your phones. To enable Location Services, you must use the Fluent app.
To enable Location Services:
- Log into the Fluent app.
- Tap
 .
. - Tap App Settings.
- Tap Location Services.
- Tap the Location Services toggle switch to enable it.
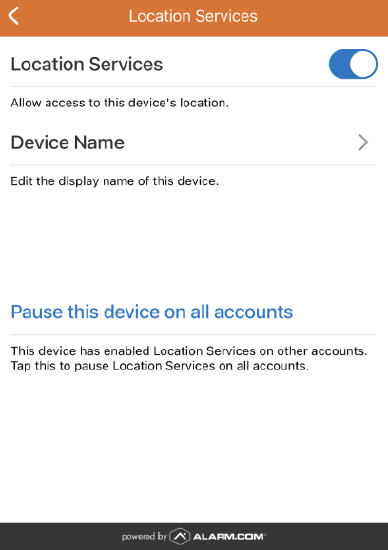
- If asked, tap Turn On to turn on Location Services.
- Location Services is now enabled for the device and appears as a Geo-Device on the Alarm.com website.
Create a Geo-Fence
Once Geo-Devices are set up, a Geo-Fence is created. A Geo-Fence is a virtual geographic boundary used for Alarm.com Places. Geo-Fences can be created and edited using the Alarm.com website or Fluent app.
To create a Geo-Fence using the Alarm.com website:
- Log into the Alarm.com website.
- Click Settings.
- Click Places.
- In Manage Places, click Add a Fence.
- The center of the fence defaults to the system's installation address. To move the fence location, perform either of the following:
- Click and drag the location marker on the map.
- Enter a specific address in the Move fence location to field and click
 .
.
- In the Fence Name field, enter a name for the Geo-Fence.
- To adjust the radius, either click and drag the Geo-Fence anchors on the map overlay, or enter the desired radius in the Geo-Fence Radius field (in miles).Note: The minimum Geo-Fence radius is 1 mile (1.6 kilometers), and the maximum is 100 miles (160 kilometers). If the account is in Canada, the minimum radius is 1.5 kilometers and the maximum is 150 kilometers.
- Click Save.
To create a Geo-Fence using the Fluent app:
- Log into the Fluent app.
- Tap
 .
. - Tap Places.
- Tap
 .
. - The center of the fence defaults to the system's installation address. To move the fence location, perform either of the following:
- Tap and drag the map to adjust the location of the marker.
- Enter a specific address.
- To adjust the radius, either pinch the Geo-Fence, enter the desired radius in the Adjust Radius field (in miles), or tap
 or to adjust the distance.Note: The minimum Geo-Fence radius is 1 mile (1.6 kilometers), and the maximum is 100 miles (160 kilometers). If the account is in Canada, the minimum radius is 1.5 kilometers and the maximum is 150 kilometers.
 - In the Name field, enter a name for the Geo-Fence.
- Tap Save.
Edit a Geo-Fence
To edit a Geo-Fence using the Alarm.com website:
- Log into the Alarm.com website.
- Click Settings.
- Click Places.
- In Manage Places, click the desired Geo-Fence to edit.
- To move the fence location, perform either of the following:
- Click and drag the location marker on the map.
- Enter a specific address in the Move fence location to field and click
 .
.
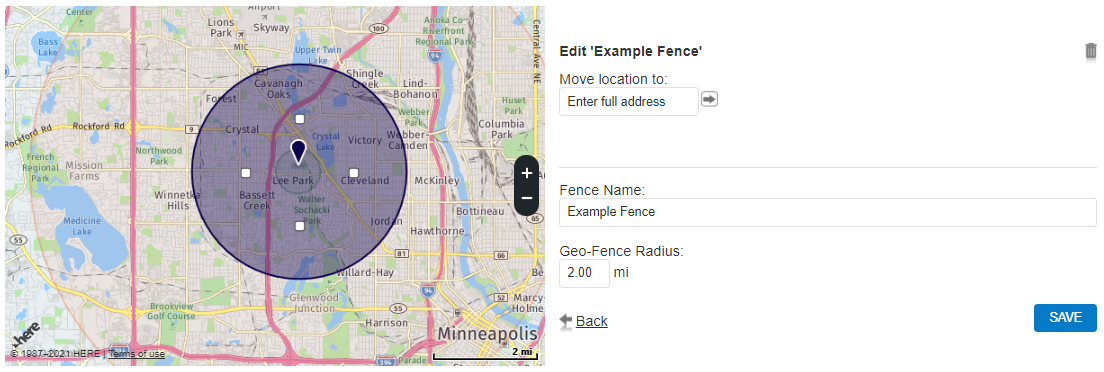
- In the Fence Name field, enter a name for the Geo-Fence.Note: The default Geo-Fence cannot be renamed or deleted.
- To adjust the radius, either click and drag the Geo-Fence anchors on the map overlay, or enter the desired radius in the Geo-Fence Radiusfield (in miles).Note: The minimum Geo-Fence radius is 1 mile (1.6 kilometers), and the maximum is 100 miles (160 kilometers). If the account is in Canada, the minimum radius is 1.5 kilometers and the maximum is 150 kilometers.
- Click Save.
The following image is an example of the map that appears to edit the Geo-Fence:
To edit a Geo-Fence using the Fluent app:
- Log into the Fluent app.
- Tap
 .
. - Tap Places.
- In Places, tap the desired Geo-Fence to edit.
- Tap Edit Place.
- To move the fence location, perform either of the following:
- Tap and drag the map to adjust the location of the marker.
- Enter a specific address.
- To adjust the radius, either pinch the Geo-Fence, enter the desired radius in the Adjust Radius field (in miles), or tap
 or
or  to adjust the distance.Note: The minimum Geo-Fence radius is 1 mile (1.6 kilometers), and the maximum is 100 miles (160 kilometers). If the account is in Canada, the minimum radius is 1.5 kilometers and the maximum is 150 kilometers.
 - In the Namefield, enter a name for the Geo-Fence.Note: The default Geo-Fence cannot be renamed or deleted.
- Click Save.
Delete a Geo-Fence
To delete a Geo-Fence using the Alarm.com website:
Note: The default Geo-Fence cannot be renamed or deleted.
- Log into the Alarm.com website.
- Click Settings.
- Click Places.
- In Manage Places, click the name of the Geo-Fence to be deleted.
- Click
 .
. - Click Ok when prompted to confirm that you want to delete the Geo-Fence.
To delete a Geo-Fence using the Fluent app:
Note: The default Geo-Fence cannot be renamed or deleted.
- Log into the Fluent app.
- Tap
 .
. - Tap Places.
- In Places, tap the desired Geo-Fence.
- Tap Edit Place.
- Tap Delete Place.
- Tap Delete Place when prompted to confirm that you want to delete the Geo-Fence.
Add Places rules and notifications
Once you enable Geo-Devices, you can configure desired Places rules or notifications. Some examples of rules are arming reminders, thermostat override, and pausing video recording rules.
Important: If multiple Geo-Devices are selected, it will require the last of these devices to enter or exit the Geo-Fence before a rule is triggered or notification is sent.
To view rules and reminders available to a specific account:
- Log into the Alarm.com website.
- Click Settings.
- Click Places.
- In Set up Rules & Reminders, it lists notification reminders and rules available for the account to create. Click to select the rule or reminder to create it.
.png)